- support@clearvisiontech.com
- (909) 484-2052


 Students
SIMON can pre-fill any field(s) on the report cards with any valid grade. This is perfect if you want some areas to default to "NA", or shaded. The teacher can override this preset by simply clicking on the field in RCM and putting in a grade. If the field is empty on the student's report card, the grade you set for that field will show.
To define preset fields, choose Auto-Fill Empty Grades from the Students option in the Utilities Menu. Select the desired report card from the list of report cards on the left. Now, simply click in the desired field and select a grade. When you are done, click Save to commit the settings.
Fields on the report card that will be preset with a grade will be displayed in green.
UNSET A FIELD
To set a field back to a non-preset field, click on the field and choose "none".
This option allows you to delete (clear) a grade from all student report cards.
When the Delete A Grade window opens, select the desired report card from the list of report cards on the left. Now, simply click in the desired field you want to clear. You'll be asked if you are sure if you want to clear the grade. Confirm to clear the grade.
This option allows you to delete (clear) all data for a report card for all students. When the Select Report dialog opens, select the desired report from the list and click OK. All data for the selected report for all students will be cleared.
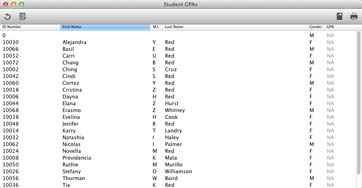
To begin, choose Get GPA from the Utilities option in the Options menu to open the Student GPAs window.
Next, we need to set the options. Click the ![]() Options button.
Options button.
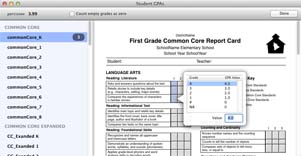
When a field is selected, or you roll your mouse over a selected field, you will see a popup area with the list of possible grades for that grade area. Enter the GPA value for each possible grade. RCM will use these values to calculate the GPA.
Use the Precision menu to set the rounding option for the final GPA. For example, 3.71, 3.714 or 3.7142.
Check the Count empty grades as zero checkbox to tell RCM to consider a missing (empty) grade as a zero. If this option is unchecked, RCM will skip empty grades and they will not count against the GPA.
Click DONE to return to the previous display where you should now see the GPAs.
You can print or save the results with the ![]() Print or
Print or ![]() Save As button.
Save As button.
Choose this option to search for students with the same ID number.
If any duplicate students are found, they will be listed. You can print or save the list of students to a text file.
User the ![]() Edit ID button to change the student's ID number. Use the
Edit ID button to change the student's ID number. Use the ![]() Refresh button to reload the list of students.
Refresh button to reload the list of students.
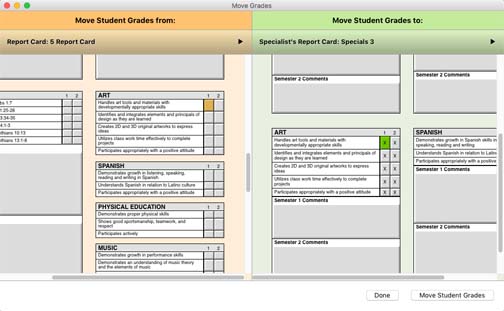
This is useful if you move a portion of your report card to another report.
Select the Source Field
The Source field is the field that contains the data you want moved. On the right side of the screen (the orange side), select the desired report. Then, click the desired field.
Select the Target Field
The Target field is the field where you want the data moved. On the left side of the screen (the green side), select the desired report. Then, click the desired field.
Move the Grades
When the Source and Target fields are selected, click Move Student Grades and the data will be moved from the Source field to the Target field.
If you need to move more than one grade, you will need to repeat the process for each field you want to move. There is currently no method to move multiple fields in one click.
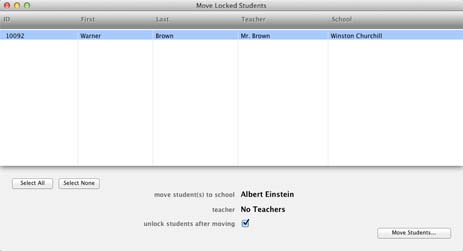
This option allows you to view all students who are locked, and move any or all of them to a different teacher or temporary place holder.
When the Move Locked Students window opens, it will list all students who are currently locked. Select the desired students by clicking their names, or use the Select All or Select None buttons.
Select the teacher you want to move the selected student to by choosing the school and teacher’s name from the Move Student(s) to School and Teacher popup menus.
If you want the students to be unlocked when you move them, check the Unlock Students When Moving check box.
Click the Move Students button to move the selected students to the selected teacher.
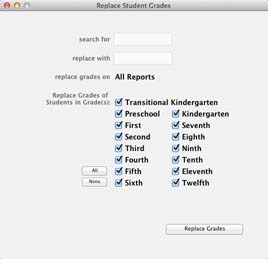
Type the grade you want to change into the Search for field. Then, enter what you want to replace it with in the Replace With field.
You have the option of replacing all occurrences of the grade on all reports, or just the report selected in the Replace Grades On popup menu.
Lastly, choose the desired grade level(s) of the students whose grades you want to change.
Click the Replace Grades button to replace the grades.
This option will allow you to generate a district-wide or school-wide statistics report on specific fields on selected report cards.
SIMON will display the number of students who received a grade, the number and percentage of students who received each available grade (A+, B-, etc.), including a simple bar graph for all the fields listed in a Grade Set. Simply select the Grade Set, and the report will be displayed.
ABOUT GRADE SETS
CREATE A NEW GRADE SET
To create a new Grade Set, click the ![]() New Set button and enter a name for your new set.
New Set button and enter a name for your new set.
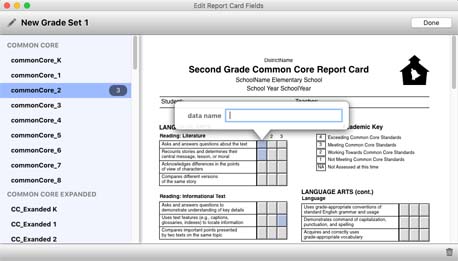
The Edit Report Card Fields window will open. All of the available reports for your school will be listed on the left. Select the desired report and the selected report card will be shown on the right. Simply click the fields you want to include in your report.
When a field is selected, or you hover your mouse over a selected field, the Data Name popup will appear. Enter a name for the selected field. SIMON will use this name on the final report.
When your desired reports and fields are selected, click Done, or simply close the window.
EDITING A GRADE SET
To edit a Grade Set, double-click the grade set's name.
DELETING A GRADE SET
To delete a Grade Set, double-click the grade set's name. Then, click the ![]() Delete button.
Delete button.
THE FINAL REPORT
When a Grade Set is selected, the report will appear. It contains some information about the report and the number of students processed. Then, each report contained in the Grade Set is listed. Within the listing for each report, the specific form and fields are listed. For each field, you will see:
Use the Text Size controls to change the size of the text in the report.
Use the School popup menu to limit the report to only students in a specific school.
To save the report, click the ![]() Save As button. You can also print the report by clicking the
Save As button. You can also print the report by clicking the ![]() Print button.
Print button.
This option allows you to set the grade of all students on a given report.
After choosing Set Grade, click the report you want to view from the list of reports on the left. The selected report card will appear on the right.
Click in the field that you want to set the grade. When prompted, enter the grade you want to set (i.e. “A+”) and click OK.
The Missing Grades utility will show you any fields that are empty on the report card.

Next, choose the desired term from the Term popup menu.
EXCLUDED FIELDS
There may be some fields on your report cards that are acceptable to be empty. For example, a Special Services check boxes, a comment, or optional classes like Band or Chorus. You can exclude these fields by clicking the Excluded Fields button.
When the Excluded Fields window opens, click the Edit Excluded Fields button. Then, select the reports and fields that you want SIMON to not consider when checking for missing grades.
DISPLAY THOSE MISSING GRADES
Finally, click the List Missing Grades button. Any fields that are on the selected report, that are from the selected term that are empty, will be displayed.
You can save the results with the ![]() Save As button.
Save As button.
The Student Login utility is used to display and edit the logins used by students to enter data that appears on the report card. For example, "Student Reflections" or other text or data.
In the Student Log window all students will be listed. Use the Select Students By popup menu to list all students or students of a specific grade level.
EDITING A STUDENT'S LOGIN
To edit a student's login information, double-click the student's name in the list and edit the login information (email address and password) as desired.
IMPORT STUDENT LOGINS
You can import your student logins from a plain text file. The format of the file is very simple. It should contain only three columns:
When your import file is ready, click the ![]() Import Student Logins button. Select your file and the import will begin.
Import Student Logins button. Select your file and the import will begin.
EXPORTING STUDENT LOGINS
You can export a list of the existing logins by clicking the ![]() Export Student Logins button.
Export Student Logins button.
RCM's Student Transcripts allow you to create a report card that can display data from multiple years. You can generate a transcript for a student at anytime.
To generate a transcript, you begin by creating a template that defines which data from your report cards will appear in the transcript. If your report cards have changed over the years, you can define where the data will come from on each version of your report cards.
THE TRANSCRIPT WINDOW
The Transcript Window contains two main sections, the student list and the transcript view.
STUDENT LIST
You can view the transcript for the selected student in the Student List. There are a number of options to help you list the students you need.
At the top of the student list are five icons. Each one can aid you to list the students you want. These icons are:
![]() List all students
List all students
![]() List students by teacher
List students by teacher
![]() List all students of a selected grade level
List all students of a selected grade level
![]() Search for a student(s) by first name, last name or ID number
Search for a student(s) by first name, last name or ID number
![]() Uses/lists students from the selected year
Uses/lists students from the selected year
You can sort the student list by clicking any of the column names.
Select a student in the list by clicking their name. When a student is selected, the transcript for the selected template will appear. You can select multiple students so that you can print or export multiple transcripts at the same time. At the bottom of the student list are select all and select none buttons.
Transcript Header Options
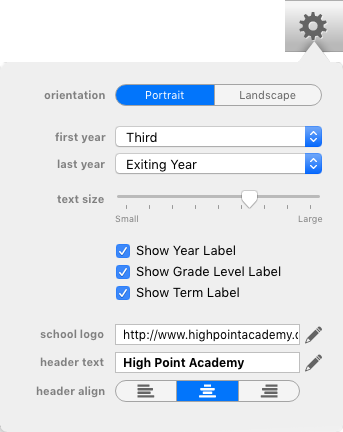
Orientation: Choose portrait or landscape.
First and Last Year: These options define the first and last year of the student's data that will be included in the transcript.
If you want all available data for a student included in the transcript, you would choose Entering and Exiting Year. However, if you are creating a transcript for a exiting 6th grader, and you only want data for grades 3-6, you would select Third for the first year, and Exiting (or Sixth) for the last year.
Text Size: The text size of the text in the transcript.
Show Year Label: Show the year in the column.
Show Grade Level Label: Show the grade level of the student for the year.
Show Term Label: Show the term numbers in columns.
School Logo: Select a image logo to be used in the transcript. You can select a local image stored on your computer, or a URL link.
Header Text: Use this area to add additional text to be included. Most users add the school name, address, contact info, etc.
Header Align: Choose if the header will appear centered on the page, or justified left or right.
SAVING THE FINAL TRANSCRIPT
When your Transcript is ready to be printed, you have several choices. Select the students you want to print and:
![]() Click the Export icon to export the transcripts as tab-delimited text files. You can then open these files in Excel or any other application.
Click the Export icon to export the transcripts as tab-delimited text files. You can then open these files in Excel or any other application.
![]() Click the PDF icon to save each transcript as a PDF.
Click the PDF icon to save each transcript as a PDF.
![]() Click the Print icon to print each transcript.
Click the Print icon to print each transcript.
A Transcript Template defines what subject areas are included in your transcript. It also defines where that data comes from on each of your report cards. You can create as many templates as you want. You may want a complete detailed version and a abbreviated version for a variety of reasons.
MANAGING TEMPLATES
CREATING A NEW TEMPLATE
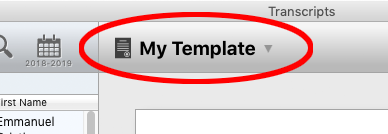
To create a new template, click the ![]() New Template button. A new Untitled Template will be created and added to the list of templates.
New Template button. A new Untitled Template will be created and added to the list of templates.
CHANGING A TEMPLATE'S NAME
To edit a template's name, double-click the template in the list of templates and enter the new name.
DUPLICATING A TEMPLATE
You can duplicate an existing template by selecting the template in the list and clicking the  Duplicate Template icon. The selected template and all associated fields and settings of that template will be duplicated.
DELETING A TEMPLATE
A template can be deleted at any time by selecting the template in the list and clicking the  Delete Template icon. The selected template will be deleted. The fields associated to the template will not be deleted.
ABOUT TEMPLATE FIELDS
A Transcript Template is basically a list of fields that define where data is to be pulled from the report cards. You might have a template field for Reading, another for Math, Spelling, Science, and so on. You can have as many template fields as you want.
CREATING A NEW TEMPLATE FIELD
EDITING A TEMPLATE FIELD
EDIT THE TRANSCRIPT FIELD NAME
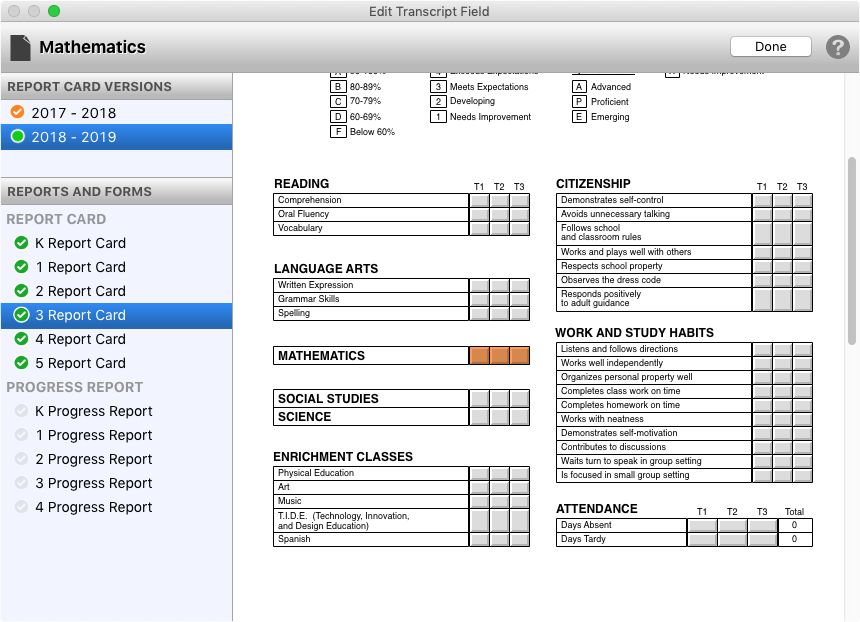
To change the transcript field's name, click the name in the top-left corner of the screen and enter the new name.
REPORT CARD VERSIONS
In the Report Card Versions section, you will see a list of each year you had a new or updated version of your report cards. If your report cards did not change for a given year, that year will not be listed.
You will want to select each year and define the target field for that year's version of report cards for the template field.
REPORTS AND FORMS
After selecting a Report Card Version, select the report card you want to mark. In general, you will want to mark each version (grade level) of your report card. For example, let's say your working on the Spelling area of your transcript. You would select your Kindergarten card, and select the Spelling areas on the report card. Then select the First grade care and select the Spelling ares on that card. Repeat for each grade level. Then, repeat the process for each Report Card Version (year).
SELECING FIELDS ON THE REPORT CARD
This part is easy! With the Report Card Version (year) and Report Card (grade level) selected, click on the fields that contain the data you want to display. Since the Transcript Field represents one single area (subject) on your transcript, you can only select one field for each term on the report card.
When a field is selected on the report card, it will be shown in orange. A check will appear next to the report card's name when any data is selected on that report card. The check will appear green if a field is selected for each term. Otherwise, the check will appear orange.